The post Laura Mercier Editorial Eye Palette appeared first on This teacher wears makeup..
]]> may contain affiliate links
Good morning, class! Today we’re looking at the new Laura Mercier Editorial Eye Palette. I received the Editorial Eye Palette complimentary via Influenster. As always, all thoughts are my own.

This new palette is one-of-a-kind.
The Editorial Eye Palette Intense Clays features studio-inspired, high-performance brushed metal and matte textured Clays to give you intense color without any shadow fall-out. Soft, flexible, clay-like hybrid textures apply beautifully with a unique, wet feel that seems to melt onto your skin. It also comes with an exclusive Air-light Setting Powder to prolong wear for up to eight hours and prevent creasing. – Sephora description
I thought I’d first swatch the shades for you. Each swatch also has a portion (on the right) that has been gone over with the setting powder.
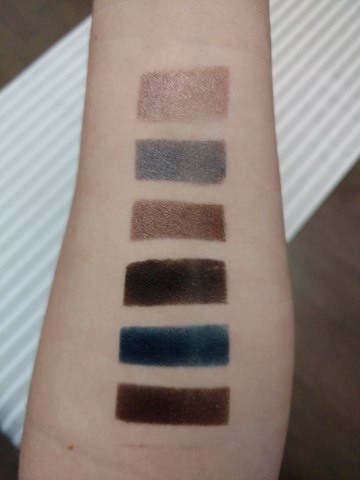
As you can see, the colors are very pigmented and offer a nice variety. However, you might notice a lack of lighter transition and brow bone shades.
There are many ways to apply the shadows form the Laura Mercier Editorial Eye Palette, but my favorite way is to “stamp and set.” This is a stamping, or tapping motion with the finger that allows for quick application while maintaining the intense pigmentation of the both the matte and shimmer shades. I made a little video for you. Please note that this is my first ever tutorial video and I apologize for the crappy lighting and dry skin on my nose…
Overall, I really enjoy this palette. If you’d like to check it out, Sephora now carries it!
The post Laura Mercier Editorial Eye Palette appeared first on This teacher wears makeup..
]]>The post DIY Sweet Coffee Mask appeared first on This teacher wears makeup..
]]>Good morning, class! Today we are having some fun with food – that is, we are using all edible ingredients to make a skincare coffee mask! I recommend this recipe for those with acne-prone or oily skin. I have another version for dry skin that will be coming soon!
Before we go forward, let me remind you that I have no dermatology background. Where possible, I’ve linked to websites that support my claims, though you may wish to do further research if you have specific sensitivities or allergies. I can attest to the fact that I’ve used myself as a test animal for this recipe!
We are going to call today’s mask the Sweet Coffee Mask because its main components are ground coffee and honey (yum!) This is a wonderful opportunity to use the coffee remnants in your filter or even what’s left over in your used K Cup, as I did.
Ingredients
Let’s talk about the ingredients and some of their benefits –

ground coffee – Caffiene, which is a diuretic, can dehydrate skin cells and make the skin appear smoother. It has been shown to help reduce puffy under-eyes and dark circles, especially (source). Additionally, the ground coffee in this recipe exfoliates when you wash your face!

honey – Honey has anti-acne properties, so any blemishes you have may appear less red and reduced in size. Honey also contains a chemical exfoliant and has moisturizing properties (source).
cocoa powder – Most importantly, it will make the mask smell fantastic! Furthermore, the fine powder can contribute to keeping your skin clear and hydrated with regular use (source).
cinnamon – Cinnamon encourages blood to come to the surface of the skin, resulting in a firmer appearance. Please note that cinnamon can be irritating, so if you have sensitive skin, just leave this out!
The Process
I’m not going to give you specific measurements, because I never measure anything. Basically, I empty the K Cup into a bowl, then add a dash of cinnamon and a scoop of cocoa powder. I top this with enough honey to form a paste.

Apply the mixture to your face, and allow it to sit for a little while – for me, it was the extent of writing this post, so about 30 minutes!

I like to remove this mask in the shower. Use a gentle hand, because the coffee will be very scrubby! Also, you can use any mixture you have left over to exfoliate your body!
While this may feel a bit more time-consuming than a store-bought mask, keep in mind that this treatment is completely edible (though you probably shouldn’t eat it) and natural. It also smells really good. Because of the exfoliation, I’d recommend using this no more than twice a week.
Thanks for reading! If you like DIY beauty like this, let me know so I can be sure to do more similar posts!
The post DIY Sweet Coffee Mask appeared first on This teacher wears makeup..
]]>The post Depotting Adventures: Mi Vida Loca Remix Edition appeared first on This teacher wears makeup..
]]>
Cute, right? It’s also incredibly annoying to use. I don’t think I ever pulled the palette out of the sleeve without getting my finger in that blue shadow…
So I began to think this would be an opportunity for some depotting practice. Unfortunately, there were few written posts online about depotting Mi Vida Loca Remix, and I am not big on watching YouTube tutorials. Some Instagram followers told me they saw that others had had difficulty depotting this palette. I became wary, but still eager to try. I went on Beautylish and ordered a handy dandy Z Palette and their De-Potting Spatula. I sat down at 9:00 PM and began.
This was the easiest depotting experience of my life. The pans basically popped right out. They were held on with tiny amounts of glue that were easily removed. I wrote the shade names on the back in Sharpie, and popped them into the Z Palette (they are metal pans so they snap right in!)
Here are some progress shots:

they pop right out. no disassembling or heat needed!


No shadows were broken in the making of my new palette. I used a “large” size Z Palette and still had room to spare, so I filled in with some of my Anastasia Beverly Hills and MAC pans.


The Mi Vida Loca Remix Palette immediately became easier for me to handle, and I am thrilled with the way this came out. What do you think? I challenge you to de-pot an ungainly palette! Leave your link below!
The post Depotting Adventures: Mi Vida Loca Remix Edition appeared first on This teacher wears makeup..
]]>The post Ocean-Inspired Eyes appeared first on This teacher wears makeup..
]]>originally posted 9/7/15 Have you ever done your makeup and just been so proud of it that you had to share? That happened to me today. My plan to create something simple quickly went sparkly and fun. I decided to call it my Ocean-Inspired Eyes look. This look features one of my favorite brands, ColourPop.

I started with a base of Mary Kay eye primer.
I used ColourPop “Girly” from my brow to my crease with a flat synthetic brush. I used the same brush to apply “Cop A Feel” to my lid.
Then, I applied “Snap Dragon” to my crease with a fluffy crease brush.
Using a small, flat brush I patted “Krinkle” onto my lid and slightly into the crease.
Finally, I went back to “Snap Dragon” and brought it down onto my lower lash line.
For liner, I used MAC Fluidline in “Wave Line” with an angled liner brush.
I applied a coat of Dior Show mascara and a trimmed pair of Red Cherry demi wispies.


I like this look because it is blue without looking like I jumped out of the eighties or a middle school dance. It is also sparkly without being glittery, if that makes sense. Basically, it’s like a really cool wet look.
I hope you can take some inspiration from my Ocean-Inspired Eyes. I hope you will share your looks in the comments!
Products used and dupes (contains affiliate links)
The post Ocean-Inspired Eyes appeared first on This teacher wears makeup..
]]>The post Covering Up a Pimple appeared first on This teacher wears makeup..
]]>In dealing with the aftermath of Holiday eating, I’m sure I cannot be the only one with one or two blemishes to cover! I wanted to share with you my method for covering up a pimple (or two or three…)
First, here are my recommended products. As always, substitute in your favorites where you see fit!

Brushes: It Cosmetics Blurring Concealer Brush #103 and It Cosmetics Powder Wand #108.
Makeup: Becca Backlight Priming Filter, NARS Radiant Creamy Concealer (Chantilly), Charlotte Tilbury Light Wonder Foundation (2 Fair) and Laura Geller Balance-n-Brighten Foundation (Porcelain).
I bet you woke up today thinking you really wanted to see a close up of someone else’s pimple, right? Sure you did.

I start by priming with the Becca Backlight Priming Filter for it’s blurring effect. Then, I apply a thin layer of the Charlotte Tilbury Light Wonder Foundation. I chose this foundation because it is medium coverage without looking heavy, a plus for when one is going to add a concealer.

Then, I dot on the NARS concealer to the affected area(s).

I use the IT Cosmetics #103 brush to lightly blend the concealer outward.

Then, I use that same brush to tap on the Laura Geller powder over the concealed areas.

Finally, I use the It Cosmetics #108 brush to lightly apply that same powder over my entire face, to better blend the concealed patches with the rest of the skin. Don’t forget to set with your favorite setting spray to avoid cakiness! And a reminder – you can cover the redness of a pimple, but not the bump! We’re not wizards here!
Wishing you the best day ever!

The post Covering Up a Pimple appeared first on This teacher wears makeup..
]]>